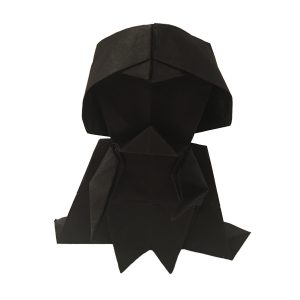
I find your lack of faith disturbing
Darth Vader, Star Wars
It’s Star Wars Day!
To fans of the movies, May 4th is known as Star Wars Day! This is a reference to a phrase frequently used in the films “May the Force be with you”, and adapted to become “May the Fourth be with you” in reference to today’s date.
Note: This post contains affiliate links. Please see disclosure for more information.
It’s not in any way endorsed by or affiliated to Lucasfilm or Disney (the companies behind the Star Wars Franchise), but it’s grown organically and has moved beyond its roots among die-hard fans to become something of an annual event on social media. With that in mind, I thought today was an appropriate day to feature Tadashi Mori’s origami Darth Vader – one of the most iconic characters in the Star Wars series.
I’ve featured a few Star Wars paper models on this blog. For Star Wars Day last year, I made the Millennium Falcon, and before that, I folded an Origami Yoda.
Folding your own Origami Darth Vader
As Tadashi Mori says, this is an intermediate level design. Not one for complete beginners, but if you’ve got a small amount of experience of origami, it shouldn’t be that much of a problem to make. The instructions are pretty clear, so if you’ve done any origami before and you can fold accurately, I suggest you give it a go. As Yoda would say “Do or do not. There is no try”.
You need paper that is black on both sides for this model. Most paper types will do. I used a sheet of origami tissue foil for the model in the picture. The 30cm x 30cm (12in x 12in) sheet of paper I had created an origami Darth Vader that stands about 10cm tall. It takes about 45 mins to an hour to make this model. You can get tissue foil from The Origami Shop – check prices and availability here.
Origami Darth Vader Instructions
Tadashi Mori has made a video for his origami Darth Vader design, which is available below. I’m really impressed with how his videos have evolved over time and how the quality of his teaching has developed. Today, his videos are extremely good quality.
He explains every step you need to make an origami Darth Vader, the folds are clear, and the pacing of the instructions is very good. This tutorial is a good example. My only criticism would be that the ‘plinky-plinky’ background piano music is unnecessary and gets annoying after a while. That apart, this is a good tutorial for a model that’s fun to fold. For more of Tadashi Mori’s designs, see Tadashi Mori’s YouTube Channel.
Good luck making your own origami Darth Vader, and May the Fourth be with You!
Get Involved
I’d love to hear your views on this Darth Vader origami model. Feel free to let me know what you think in the comments below, or you find can me on Instagram or Twitter. Check out my Pinterest boards too!
Sign up for my origami newsletter here and get our free Origami eBook.
Disclosure: This post contains affiliate links. This means we will receive a small commission for some purchases made using links in our blog with no additional cost to you. Please be assured we would not promote any product unless we believe that our readers will also benefit. The commission does not influence the editorial content of this site.
Origami Expressions is a participant in the Amazon Services LLC Associates Program, an affiliate advertising program designed to provide a means for sites to earn advertising fees by advertising and linking to amazon.com, amazon.co.uk, amazon.ca. Amazon and the Amazon logo are trademarks of Amazon.com, Inc. or its affiliates.


Stuck at 41:30. How do i get the 2 layers that go into each other?
Hi.
You should be able to see how Jo Nakashima opens the paper out in the preceding minute or so to get the flaps in the right place. It can be a bit tricky to slot one flap inside the other – particularly as the model is curved at this point and sometimes it will pop out if it’s not a tight enough fit, or not go at all if it’s too tight! Keep perservering, but if you still can’t get it, use a dab of glue to just stick one behind the other. I won’t tell if you don’t – just don’t let on that I told you!