Life isn’t a tiptoe through the tulips
Shannon Hoon
About the Traditional Origami Tulip
The annual RHS Chelsea Flower Show takes place this week, so I thought this would be a good time for a post about an origami flower, and I remembered the tulip displays I had seen in Central Park on a recent trip to New York. The Chelsea Flower Show, organised by the Royal Horticultural Society has been held in the grounds of the Royal Hospital Chelsea, London every year since 1913, apart from gaps during the two World Wars. Once Britain’s largest flower show (it has now been overtaken by RHS Hampton Court Palace Flower Show), it is still the most prestigious.
There are many different flower designs available, including roses, chrysanthemums, gerberas and orchids. In fact, an origami version of just about every type of bloom or blossom you can think of has probably been made by somebody, somewhere. There are also origami designs that look generally like flowers, even though they don’t resemble any specific plant.
I have usually been quite disappointed by my attempts to make origami flowers. I have several books on origami flowers in my collection, but I’ve never been happy with any of the results. Whether it’s down to my folding or my flower arranging skills, I’ve always felt that the origami flowers I’ve made don’t look anywhere near as good as they do in a photograph. This traditional origami tulip is the exception. I think this is one of the best traditional models there is. I like it because it is simple and elegant. There isn’t a single fold line out of place. Of course, it helps that it is very simple to do. Anybody can make this and produce an origami flower they can be pleased with.
Folding the Traditional Tulip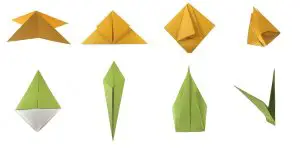
Like all the traditional models I have featured on this site, I have included folding instructions. It takes about five minutes to make this tulip.
Any paper will do, but for best results, choose paper that is the same colour on both sides to avoid the white background peeping through at any point. You need two sheets of paper the same size – standard 15cm x 15cm (6in x 6in) origami paper (kami) will do nicely.
Video Folding Instructions
For the first time on Origami Expressions, I’ve included a tutorial video showing how to fold this model! If you prefer to fold from diagrams, I have included them further down this page, below the video.
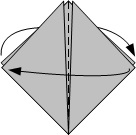
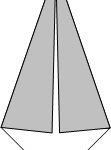
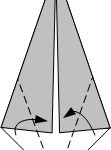
Origami Tulip Diagrams
For the Flower
For the stem
Assembling the Tulip
| Step | Picture |
|---|---|
| Insert the tip of the stem into the base of the flower |  |
| You have completed the Tulip |  |
You could make one single tulip, but they can look quite good if you make several, using more than one colour for the flowers. Then you can have your own origami tulip flower bed, much like the ones in the Park.
Get Involved
If you have folded this origami tulip model before, or if you liked the video, please feel free to get in contact, either by commenting below, or find me on Instagram or Twitter. Check out my Pinterest boards too!
Sign up for my origami newsletter here and get our free Origami eBook.








I liked the video. Your pacing was just right for me and I am a. beginner. You did not narrate the video. Why? I do better with visual clues as well as audio.
Hi Ruth,
Thank you for your kinds words, I’m glad you found the video useful. I will be adding audio commentary to videos in future, I didn’t do it for this one because I found it difficult to fold and talk at the same time! I’ll get better with practice though. Please do keep an eye out for more videos on this blog. I am planning to add videos for new posts, and also for some of the models I’ve already featured.
R.
I found this a great present it was useful and simple
Hi Kacie.
Thanks for commenting. Glad you like it! It’s a fun model and simple to make. It can look really good if you make several of them in different colours and put them all together.
Very clear video and I was able to make the tulip. Slowed the speed a little, could just pause when I needed it and rewind a bit at the complicated middle. Looks like a tulip, thank you!